Free background from VintageMadeForYou

Welcome!

Welcome!

Monday, July 21, 2014

A Week of Roses - Day One, Red

Hi!  I thought I'd do something a little different this week around my other designing company blogs, and that is to blog about some of my rose cards.  Each day will show a different rose card, new and past, but mostly new.

My first one is this red rose.  I sent this card to a friend of mine for her birthday.  I don't know what it is about red and white, but with the main image stamped in black, then using those two colors- it's just a "WOW" factor.  The rose stamp is from Stampin' Up, and I paired it with some of the new Spellbinders Card Creator dies, and an embossed card.  Happy Birthday, Janet!


Sunday, July 20, 2014

I am beginning to learn...

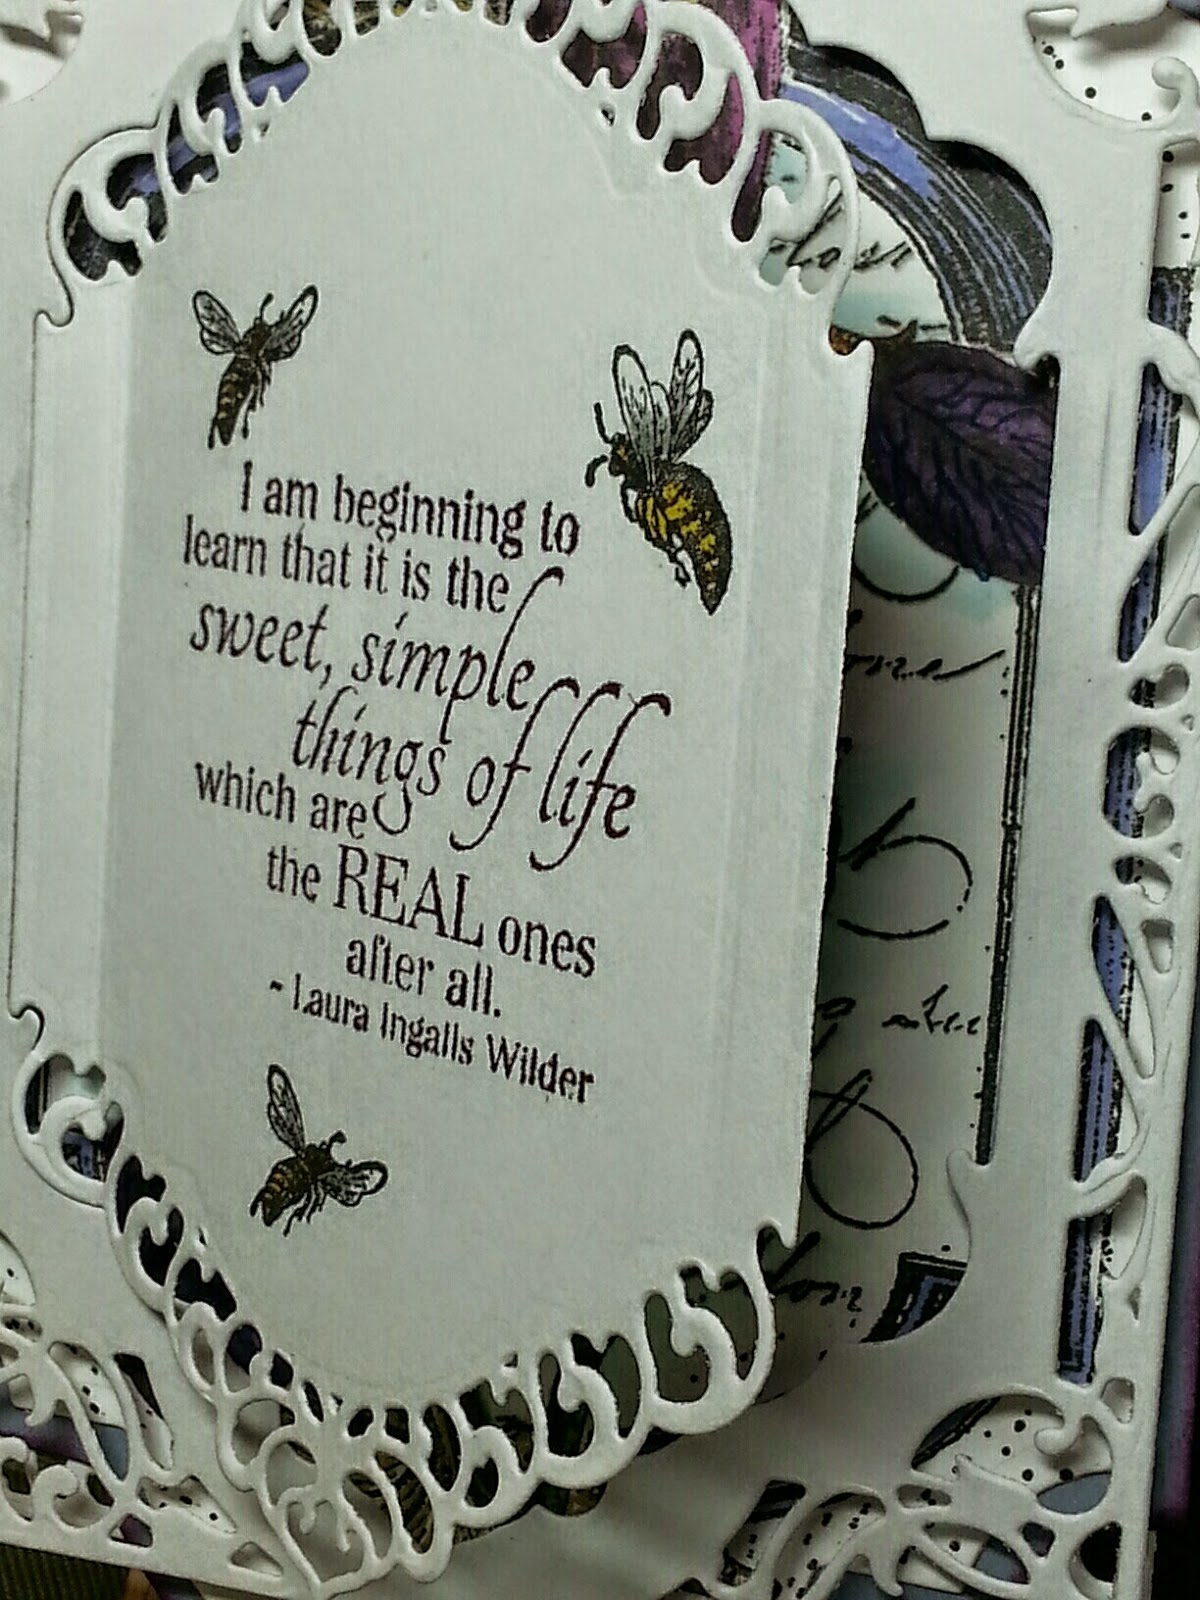
Hello!  "I am beginning to learn that it is the sweet, simple things in life which are the real ones after all", said Laura Ingalls Wilder.  Through normal everyday life, I'm finding this is to be true.  I just got this stamp from Our Daily Bread Designs in the set called "Clover".  As I was going through my boxes of stamps, I found the beauty that was used on the inside that hadn't been used in a long time.


This little "door" is the only part of this card that opens, which makes it unique.
This iris is one of my favorite flowers.  Although they've bloomed for the year, this one will live on and on.

 
I wanted to show the detail in the flowers, and the Flower Soft I used for the "fuzzies".

 
This last photo show the back of the card, just flipped over.  There is lots of room for the sentiment with the card dimensions being 6 1/2" x 4 1/2". 
 
Thank you so much for dropping by!

Wednesday, July 16, 2014

Happy Birthday to you! Stepper Card - Our Daily Bread Designs

Hi, dear friends!  Here's my third card in a series of five for the month of July as guest designer for Our Daily Bread Designs.


I wanted to use more of the beautiful cardstock that was in the Blushing Rose Collection.  It makes layering a card with several elements very easy!


I used a piece of white cardstock measuring 8 1/2" long, and 5 3/4" wide.  I scored the card width-wise at the 3", 5 3/4" and 7" marks.  The 3" score line is folded down, the second up, and the last down.  Your card should stand up after pressing your score lines down. 

I die cut two of the cross corners using the die from the Decorative Corner set.  Memento Rich Cocoa ink was used on a  sponge dauber to "age" the cross corners.  I glued one on the right bottom corner of the second panel, and one in the left lower corner on the back of the card.  The glue was applied just to the very outside edges of each die cut, and not across the middle, so this could be used as an "pocket" in which to put a little card, or in this case, the bookmark.

I cut a rectangle piece of white cardstock, and then traced around it on the pink cardstock, cut it 1/8 " wider than the white, to use as a mat for the white.  I used the same corner cutter for each corner on both.  I applied the pink rectangle to the lower right side of the front panel, then tied a length of ribbon around, then tied it in a bow near the bottom right corner of the pink mat.  The white rectangle was applied with dimensionals so give it a little depth, folding over the bow loops to make the bow as shown.  I hand cut the sentiment from the Blushing Rose Collection, and glued it to the front of the white rectangle.  As I said, the sentiment pieces in this collection of cardstock are fantastic, and make creating a beautiful but very easy card very fast and convenient.  I left the inside blank for a suitable sentiment, and writing space on the back of the card, and on the back of the bookmark.  The bookmark is a scrap piece of the rose cardstock with some of the bottoms of the roses cut with a craft knife, so that they overlap the top edge of the card, while on the back, the bottom left edge of the bookmark fits into the decorative corner die cut.  I rounded and distressed the edges of the bookmark, then matted it onto the same pink cardstock used before.  With a 1/4" hole punched in the top center, ribbon and trim were threaded through and tied at the top.

Here's a photo of the back of the card -


The last thing I did was to stamp the bees, color them, and cut one out.  The bee on the second layer was stamped first, and then the same bee was stamped on a scrap of white cardstock.  I colored them the same, with the yellow marker on the body, and the lighter blue on the wings, then cut the bee on the scrap paper out.  I positioned and glued him on so that when the card was completely closed, he was overlapping the same bee stamped on the inside, so that the second bee couldn't "bee" seen!  Then when the card was opened, both were visible, along with another bee stamped on the inside facing the opposite direction.

Supplies you'll need for this card are:

     ODBD Stamp sets - Clover (bees)
     ODBD Die set - Decorative Corner
     ODBD Blushing Rose Collection of papers
     Versafine Black Onyx ink pad
     Memento Rich Cocoa ink pad
     Yellow and light blue marker of choice
     Ribbon of choice
     Sponge dauber
     Dries Clear glue
     Dimensional adhesive

I hope you'll enjoy making your version, and I'd love to see them if you'd like to link back to your page so I can visit!  Please take a second and leave a comment for me, and better yet, become a follower!  Thanks for visiting!  Have a safe and happy summer! 

Tuesday, July 15, 2014

Persian Motifs

Hi, everyone.  I purchased a duplicate set of Spellbinders Persian Motifs dies, and they are in an unopened package.  Now, I know most of you have done this yourselves!  It's too late for me to return the dies to the company purchased from, so I am offering them for sale at 50% off.  $15.00 plus $2 shipping.  Anyone out there want them?  They're gorgeous!

Persian Motifs

Thanks!  I hope you all had a great 4th of July, and your week is going well!

Hugs,
Clare

Wednesday, July 9, 2014

Bloom Where God Plants You

Hello, everyone!  Happy Summer!  The flowers are in full bloom, and butterflies are everywhere!  I love cards with both of these elements, and these from Our Daily Bread Designs are so impressionable!


This card made for the second week in July for ODBD's guests designs, is one that I really enjoyed making - different for me with the machine stitching on it, and simple.  I used the sentiment, "Bloom where God plants you" as part of the focal piece, from the new ODBD stamp set, Bloom.  To accompany the sentiment, I added a paper bow and twice-stamped butterfly.   Below are the complete instructions, and a list of supplies you'll need to recreate this beauty.

I cut a white card base to 5 1/2" x 4 1/4".  From the new paper pad Blushing Rose Collection, I chose scraps from five sheets of different, but coordinating paper.  I laid them out in different ways to resemble a quilt, then tacked them down just in the centers of each scrap piece, so there wouldn't be difficulty stitching them to the card base through adhesive, which would eventually jam the needle or break the thread.  I used several different stitches, as my grandmother did on a crazy quilt.  On the inside of the card, I cut a piece of one of the patterned green papers to the same dimensions as above to cover the stitching back and loose thread ends.

There was some small beading in my stash that set the sentiment off, so I glued it around it.  The sentiment was stamped in green, and a little of the flowers at just the top of the flower stems stamp used along the bottom of this piece, in coral.  Both of these stamps are from the set Bloom.  I love the font this was written in!

The butterfly is a single stamp from ODBD, called Butterfly Single.  I stamped it twice on the same patterned paper to match, in Versafine Black Onyx.  The bottom butterfly was touched up with a little of the coral color just in the center at the body, extending out into the wing area to shade.  The top butterfly I left alone with color, but did apply some glitter to the body.  I glued the two bodies together just in the center, and manipulated the top one so that the wings would stand up some, and show the dimension of the bottom flutterby.  A little glue on the butterflies, and a paper bow with a button glued in the center finishes off this pretty card.

Supply List -

Our Daily Bread Design's stamp sets - Bloom, Butterfly Single
Our Daily Bread Design's Blushing Rose Collection
White cardstock
Versafine Black Onyx ink
Stampin' Up's classic Gumball Green and Cameo Coral ink pads
Sewing machine, pink thread
Button
Seed beaded trim
Aileen's Super Tacky Glue
tape runner
Glitter - Art Institute's #147 Pink Azalea Ultrafine Transparent

Thank you for coming to visit, and I hope you've been inspired in some small way!  See you next week!


Sunday, July 6, 2014

Wish for you

Have you ever had a wish for someone and didn't know how to send it?  Hi, everyone.  I'm sure that this wishful card would delight anyone you had a good wish for.  I think it would wish someone a great day, a better tomorrow, a wish for good health, better health, a wish for healing, for comfort, for anything you can imagine.  Of course, it would be a good one to send to a girlfriend, mom, sister, aunt or even someone you've never met, but wanted to wish a good day!  Your pick!


I've been really fascinated by some of the newer Spellbinders dies, and I've used four of them here.  I'll be glad to let you know what they are if you'll just contact me.  The word, "Wish", is one of Stampin' Ups beautiful word stamps.  I've used them so many times.  I cannot for the life of me remember where I got the image of the tulips from - if you know, can you please tell me?  My mind has gone, and it's not in the last place I looked for it!

I hope you enjoyed your 4th of July weekend, and tomorrow starts a new week.  Have a great week, and I hope you'll visit again soon!  Thanks for coming.

Wednesday, July 2, 2014

Our Daily Bread Designs - "Goodness Rose"

Well, what a blessing it is for me to have been chosen as Our Daily Bread Designs July Guest Designer!  I was so surprised, and it felt like "a sweet kiss on the cheek from Jesus", as my friend Kaye used to say! 

It has been hard to find good quality and selection in bible verse stamps.  Our Daily Bread Designs is my "go-to" place!  I guess I'd better get to the reason I'm here - cards made using some of the newest stamps from ODBD!  For the month of five Wednesday's, I will tell you how I made the cards, then supply a complete list of ingredients.

My first is this 5 1/2" x 4 1/4" card, made using white card stock as my base, then covering this with a piece of the wonderful rose cardstock in the Blushing Rose Collection.  Each sheet is gorgeous, so I'm sure whatever you pick to use will be beautiful!  I had some antique-looking ribbon trim in off-white that seemed perfect for an accent down the right side of the rose patterned paper, adhered to the back with ribbon tape prior to placing on the white cardstock base.  On a scrap piece of white cardstock, I stamped the frame from Vine Borders in pink ink, the sentiment from the Cherry Blossom set in light green, then cut out close to the edges, which I aged with a little distress ink.  I placed a pearl on each corner, and dimensional tape squares on the back. 

Inside, there are two scrap strips of the coordinating cardstock, and I stamped the "Thank You!"  from the Cherry Blossom set to the right of these, on the left side of the card.  To finish, I adhered the square sentiment to the upper left front, aligning the left edges of the cardstock pieces.  A 6" piece of scrap ribbon trim was folded in the shape as shown, and glued in place, with the rose centered on it.  An off-white pearl stickpin was placed into the center of the ribbon and pushed down until the pointed end nearly protruded from the rose and ribbon.


The small 1" rose is one I struggled with, trying to make my own pattern with ruffled edges on the petals.  I am pleased with how it turned out in the end.  There were 20 petals cut out of thin white cardstock, and shaded in pink and coral inks on the innermost parts of both sides of each petal, fanning out with color not quite to the outer edge.  I shaped each petal, then glued them all together, and hand-cut two leaves out of some coordinating green paper from the above cardstock collection.  If you're not into making your own flowers, a purchased rose will work just fine!


Supplies needed -

     Our Daily Bread Designs Blushing Rose Collection 
     Our Daily Bread Designs stamp set Cherry Blossom
     Our Daily Bread Designs border stamp set Vine Borders
     White cardstock, scrap of green for rose leaves
     White cardstock thinner than your card base for the rose or Purchased Rose
     Stampin' Up Pink Passion, Cameo Coral and Pear Pizzazz classic ink pads
     Pretty ribbon or trim
     Adhesive of choice - I used Aileen's Tacky Glue, dimensionals and double-sided tape

Friday, June 20, 2014

Springtime Dogwood

Hello!  In my last post on strawberries, I was talking about how good that fruit is in the springtime.  I love the flowers that bloom on the trees here in Tennessee, and the Dogwood is one of them.  There are several varieties, which makes for a rainbow of flowers!  I had a lot of fun creating this card, and I hope you like it.


This print of the dogwood is another I had in my stash, which I found when I found the strawberry print from last post.  Thanks to Spellbinders for some awesome die cuts which really added to the card's overall delicate feel.  I like to put one of the little punched butterflies on each of my cards. 
 
I hope this card has cheered you!  Please leave a little note in the comment section if you'd like.  I'd love to hear from you!  Best wishes to all!
 

Thursday, June 19, 2014

Springtime Strawberries Look Good Enough to Eat!

Hi, Friends!  I love Springtime, and the beautiful, delicious strawberries it brings with it!  There is a strawberry farm not far from here, where one can go pick as many as desired, any size, but all delicious!  There is nothing more heavenly than to have strawberry shortcake with fresh berries layered with cake, vanilla ice cream and whipped cream.  This card reminds me of the farm, and the tasty berries we enjoyed a week or two ago.


The strawberries on this card are a digital print I found in my stash, and I'm sorry to say I don't know where I got it from.  The word "Spring" is from a set from Stampin' Up, and I'm sure it's been retired long ago.  The card base is Real Red from Stampin' Up, as well as the Green Galore ink used to stamp.
 
Thank you for stopping by, and I hope this post made you hungry for some fresh fruit!  Come back again!

Wednesday, June 18, 2014

I'm Back! And Happy Father's Day!

I hope all your guys out there had a great Father's Day.  We did more work than anything, but we didn't have any other choice. 

I really liked the way this Father's Day card turned out.  Heartfelt Creations has produced some fantastic stamps just for guys.  Those are what I don't have enough of.

The front of this card was stamped using the Heartfelt Creations World Map stamp.  I used Versafine ink in Onyx Black and colored just parts of the map with shiny colored pencils.  The continents were outlined using silver, gold and copper fine-tipped markers.  I tried it first using regular colors to make it look like a colorful globe map, but I didn't like the way it turned out.  These muted tones look so much better.  I punched a tiny slit in the fold of the 5 1/2" by 4 1/4" card where the twine tied in the Sailor's Knot would go through, so it wouldn't have so much bulk.  For Barbara Anders directions on how to make the Sailor's Knot, just click on the words.  The ends of the twine were taped on the inside left panel of the card, then covered with some pieces of cardstock from the Tradewinds matstack by DCWV. 
I don't know where I found the stamped images of the sailboat, but I have a sneaking suspicion it was Jane's stamp (the person who got me" hooked" on stamping)!  I used the muted colors again, and cut portions of the areas between the sails with a craft knife.  I mounted it with dimensional foam squares (which you can see if you look closely, shame on me), onto the compass from Heartfelt Creations Celebrate the Journey Sentiments stamp set, heat embossed in dark brown.  I applied this to the gold piece of cardstock, cut using the Spellbinders Card Creator Herloom Legacy.  (this is the way they have it spelled on the packaging)  To finish it off, I applied some self-stick copper rhinestones, and glued a shell from my stash through a few of the twine strings. 

I must say, it's good to be back after a long recuperation period!  Let's all knock on anything close by that's wood, so I don't jinx it!  After a fourth left shoulder surgery, and one on my right elbow, enough is enough, already! 

I've missed you all, and am so glad to have you visit!  Please refer my blog to a friend if you like it, and I sure do appreciate your visit!  Come back again soon!

Love to all, dear friends!

About Me

My photo
Lebanon, TN, United States
I am a child of God, wife, mother of three, and gramma of six. I enjoy stamping, scrapbooking, beading, photography, sewing, camping, fishing, hiking and life! I am a retired dog groomer. Denver, Colorado, is where I was born and raised. I miss the snow and drier weather.


Blog Archive