Free background from VintageMadeForYou

Welcome!

Welcome!

Saturday, April 28, 2012

It's Hard to Say Goodbye

I know I'm getting older, because I can feel it!  I've lost a few friends, and several others have gotten sick.  I don't want to get old, but I know it's all in God's hands, not mine, and there is nothing I can do to change it, prevent it, or stop it.  I don't want to sound morbid, but it's one of those things in life that eventually one has to discuss, we just put it off, and sometimes until it's too late.

I've recently come down with Diabetes type 2, and since my diagnosis, I've lost 44 pounds.  It seems as though I've come to a plateau, but hopefully, it's just a minor one!  I haven't felt this good in a long time, and then again, other things hurt more!  Go figure!?!  Don't wait until something happens to jeopardize your health before starting to take better care of yourself!  I care about you, and so does your family!  Your body is God's vessel, so please take care of it while you're here!  I'll step down off my soap box and get on to my card, now.


This sentiment is one from Justrite Stampers.  The roses were made from white cardstock scraps, and the leaves from green textured cardstock.  The edge punch is from EKSuccess.  Cardstock is from my stash - I'm sorry about not having all the details about what I used on this card - it's one of those that I needed in a hurry, and I used a little of this, and a little of that, from here, and from there. 

Thank you for your visit, and I hope you'll come back again soon!

Tea Time

Hi, all!  It's time for tea!  A friend gave me a few sheets of stamped images, and these sweet little girlfriends having tea was one of them.  Thank you so much, Jane!  This cuppa's for you!  I've had many a tea time with Jane or girlfriends, but none sitting on the floor, and my stuffing was certainly not coming out, although, I was wearing a dress and a hat!  lol  Not to mention the pearls, ruffles, rings, feathers and all the other foo-foo stuff that goes with it!

The lacey background diecut was given to me by another friend, Donna.   She was travelling home from Florida where she spends the winter, and stopped here on her way back.  She very generously loaned me her collection of dies, and what a collection!  All types, all sizes, all brands, all themes!  It took me, no kidding, one full day and half of another to diecut just the ones I'd never seen, but knew I would use - lots of flowers, leaves, branches, stems, lacey things, etc.  There were so many that I didn't get to cut, but that gives us an excuse to get together again - for tea!  lol Thanks again, dear Donna!  Or should I say, Die-va! 

The patterned cardstock used was from a DCWV Glitter Stack, layered on Stampin' Up's solid cardstock in Pretty in Pink and Lovely Lavender.  The diecut was done in white, and I apologize for not having the name of the specific die.  I used Spellbinders Labels Twenty-four to cut the layers and a Spellbinders Labels Twenty-one to cut the bears out.  This was all adhered to a base of burgundy-brown plaid paper on white cardstock, along with some ribbon from my stash.  The leaves were cut from a scrap of green textured cardstock, and the roses were handmade using a diecut from Donna, and scraps from punching.  I used a Sakura black gloss pen for the eyes and noses of these little gals, along with some spot of glitter glue on the flowers on the bow and bears.  The butterfly in the card above is a re-gifter from a card I had received, commercially made, but the colors were perfect!
Before finding the brown and pink butterfly, this butterfly was the original.


This sentiment is one I purchased from Quietfire Designs, and one of my favorites.  I've been blessed to have some friends like this, and I hope you have too.  I really try to be this kind of friend, too, because I do care.
Thank you so much for visiting my blog, and I would sure appreciate you leaving a comment below.  Better yet, become a follower, and tell your friends about it!  lol  I'd love to inspire someone!  But seriously, thank you for spending a little time with a friend.


Heartfelt Creations Winner

Good morning!  If your name is Cathylynn, you have been randomly chosen from Selma's blog as the winner of this month's blog hop drawing!  Make sure to email emmalou@heartfeltcreations.us with your information!  Congratulations, and we know you'll enjoy your Heartfelt Creations products!

Have a great weekend, everyone! 

Tuesday, April 24, 2012

Heartfelt Creations Alumni Blog Hop - April 24, 2012

Hello, everyone!  I hope this finds you all well and happy!  I'm happy that Spring is here, and that we'll have more sunny days than in Winter, but still, the weather the last eight months has been kind of strange!  It looks like Summer out already with the trees, bugs and flowers, but the coolness belies that it's Summer - it's still very much Spring, and the weather is subject to change on short notice!
 
I'm here to share a card with you, for the monthly Heartfelt Creations Alumni Blog Hop.  I hope you've enjoyed the hop so far, and have been encouraged or inspired to create something of your own!  In my visits to the blogger's sites, I never leave without some kind of inspiration!  You would have arrived here from the fantastic Tesa's blogsite, if you're following along in order.  If not, that's OK, too!  Here's the order:

ME at http://clarespaperworks.blogspot.com   <----you are here

Don't forget that there is a $25 gift certificate for one lucky winner from Heartfelt Creations, and that if it's you, you'll need to email Emma Lou at emmalou@heartfeltcreations.us on Saturday, when the winner is announced to claim your $25.00 gift certificate.  Be sure to put Winner of March Alumni Hop in the subject line.  We will all try to put the winner on our blogs. 

I've been needing a few "In Sympathy" cards lately, and this one was for a male friend of ours whose father passed away.   The Heartfelt Creations stamp set HCPC 3377 Sympathy Sentiment PreCut Set was perfect, using the "In Sympathy" stamp, and the one that says, "May the precious memories of your loved one, carry you through this difficult time," for the inside, which I neglected to get a good photo of.  (sorry!)


I used the new Spellbinders Persian Accents Shapeabilities and Oval Medallion Labels.  I was given a bolt of woven ribbon that was very regal and masculine, which went perfectly with the blue and gold embossed cardstock which was a scrap.  The base for the sentiment was cut with the oval medallion dies, and I don't know where I got the scrap piece of paper that was white with gold flecks in it.  The blue cardstock is from Stampin' Up, and is called Night of Navy.  I used a white base for the top 3/4 of the card, then mounted all on a Night of Navy card base.  The bottom edge of the navy card base was dry embossed using a Cuttlebug embossing folder called Textile.  I added a few gold "pearls" and it was done.  Finished size is 5 1/2" wide by 6" high.

Next on the hop is the very talented and creative Linda.  Just click on her name to instantly travel through blogland and arrive safely at Payne Holler Cards.  We hope you're enjoying all of the creativity that each lady brings to the hop, and that you'll come back again!  Hops start on the last Tuesday of each month (if there are enough designers participating) and ends on Saturday, at which time the winner of the drawing for the $25 gift certificate will be announced!  Good luck, and thank you for taking time out of your very busy schedules to hop!  Isn't it fun - hop, hop, hopping along!

Monday, April 23, 2012

A Late Nicecrane Easter Wish For You

I know I'm just a tiny bit late in getting this posted, but I have no excuse.  Just this last week, I broke one of my fused toes.  I should say one of the dogs broke it, and it sure hurts like crazy!  Is that a good late excuse?  lol  I hope you had a beautiful and blessed Easter.


Three little bunnies eating their Easter morning porridge to fortify themselves before
they have to deliver Easter baskets to all the children in their neighborhood. 

I love these images from Nicecrane Designs. 


A closeup of the details and the handmade paper roses.

The inside with ample room to write whatever you'd like to say!

HAPPY BELATED EASTER!  HE IS RISEN!  And, yes, these are real eggs! 
Thank you for visiting, and I hope you'll come back again!  More to come real soon!  Take care!

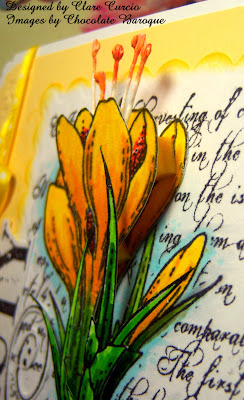
Chocolate Baroque Elegant Crocus Beauty


Finished size – 6 ¾” high x 4 ¾” wide (including flower and swirl)

Chocolate Baroque Supplies:

Elegant Crocus stamp set - large crocus with text background, small crocus single flower, crocus border and large upright crocus
Artistic Expressions stamp set – “Beauty” and swirl stamps

Other supplies:
  • Versafine Onyx inkpad
  • Stampin’ Up Classic inkpad in Daffodil Yellow
  • Adhesive/glue
  • Pop dots
  • Wilton’s artificial stamens
  • Spellbinders scalloped rectangle die (large)
  • Diecutting machine of choice
  • corner punch/embosser
  • 1/8” wide white-dotted yellow satin ribbon
  • Stampin’ Up white and Daffodil Yellow cardstock, Daffodil Yellow and Glorious Green markers
  • floral border punch
  • scissors
  • hobby knife
  • Copic markers in Y11 Pale Yellow, YR04 Chrome Orange, YR31 Light Reddish Yellow, YR12 Loquat, B00 Frost Blue, G09 Veronese Green, YG41 Pale Green, YG45 Cobalt Green

Instructions:

Cut a piece of white cardstock 6 ¾” high by 8 ½” wide.  Score in half at the 4 ¼” mark then fold and crease well.  Use the corner punch to punch the two upper corners through both layers.  Cut a piece of yellow cardstock 6 3/8” high by 4” wide.  Use the border punch on the bottom edge and the corner punch/embosser on the two top corners.  On this piece, stamp the border crocus along the left and right edges using the Daffodil Yellow inkpad.

You will need a piece of white cardstock at least 6” high by 3” wide for the focal image.  Using the onyx black inkpad, stamp the large crocus and written background image onto this piece of white cardstock and again on a scrap piece of white big enough for the large upright crocus image, and the small single crocus flower.  Color in the images using the Copic and Stampin’ Up markers, outlining in blue on the largest base image.  I used the YR04 Chrome Orange in the upright Crocus image for the inside of the flower petals.  Fussy-cut the smaller single Crocus flower, some extra leaves and the upright Crocus with scissors.  Cut the stamens to desired length, and tape or glue onto the back of the crocus images – set aside. 

On the largest image with the background text, use the largest scalloped rectangle die to center  over the image and diecut using your favorite diecutting machine.  Using the yellow inkpad and dauber, sponge all outer edges of the diecut image. 

On a piece of white cardstock scrap at least 4” by 3 1/2”, stamp one swirl on the left side of the cardstock, using the Daffodil Yellow inkpad.  Using the onyx ink, stamp the word Beauty over the swirl.  Fussy-cut the swirl/word image out with scissors and/or hobby knife.

Position the yellow cardstock piece in the center of the front of the white card base.  Adhere.  Cut a piece of yellow ribbon with the white dots, 16” long.  Tie around the left edge of the card into a little bow, weaving the end through the holes cut in the swirl.  Pop the swirl/word “Beauty” up with pop dots and adhere partially over the ribbon, and the left edge of the focal image, vertically.  Apply pop-dots or adhesive to the back of the small crocus, and position and adhere beneath the “B” in Beauty.  Position the large upright crocus in the center of the focal image, and adhere with pop-dots on the top half only.  Use adhesive for the bottom half, adhering flush and making the bottom of this cut piece line up with the base image, so it looks like it is growing out of this base.

Finish off the inside as desired, and you are done.  Any questions, please let me know.  I’ll be happy to go over the directions step-by-step.


Monday, April 2, 2012

To A Special Friend

Nicecrane Designs has blessed me with some gorgeous images to use on my cards!  The one shown on the card below is one from an Artist Trading Card (ATC) sheet, called The Talking Clock.  I love these Victorian pictures of little children! 

I have a special friend that I gave this card to - Debra.  She has been such a good friend to me, and asks for nothing in return.  I hope you like it!


The sentiment stamp for the inside is from Verve, and I used Stampin' Up inkpads.

About Me

My photo
Mount Juliet, TN, United States
I am a child of God, wife, mother of three, and gramma of six. I enjoy stamping, scrapbooking, beading, photography, sewing, camping, fishing, hiking and life! I am a retired dog groomer. Denver, Colorado, is where I was born and raised. I miss the snow and drier weather.


Blog Archive