Free background from VintageMadeForYou

Welcome!

Welcome!

Thursday, November 29, 2012

A Christmas Ornament

Merry Christmas, everyone! It's that time of year to celebrate again, and the Chocolate Baroque set Pears and Baubles is an awesome one to start your cards with! The detail on these stamps is so exquisite and fine! It was a lot of fun, and very relaxing to sit and color all the little spaces! This is one set I will be using over and over again!

 The word "Joy" is from the Chocolate Baroque set, Ivy Trails. I stamped the bauble in black ink and colored it in with water-based markers, then cut it out close to the outline. Some little shiny round stickers were placed in the center, on the word 'Joy", around the periphery of the ball, and on the bottom left corner. I used the smaller ornaments for the inside of the card.  I must apologize for not knowing where I got the inside sentiment!  I'm sorry!  It's a great one!

I wish you all a very Merry Christmas, and a blessed New Year!


Fall "Waterfall" card

"Happy Fall, Y'all," as they say here in the South! The colors are so beautiful, and one more good rain storm and a little wind, and the trees won't have anything left on them! I love the crunch when one walks on fallen leaves!

Here's a new card that reflects the golden splendor of Autumn, using the new Terrific Treescapes clear rubber stamp set from Chocolate Baroque! Just click on the name above, and you will be taken to the CB website page for this set. Adding any of these trees to a hilly landscape will give you the perfect panorama view of Tennessee in the fall, and perhaps where you are, too. Autumn is probably just as beautiful where you are, but I'm partial to my "neck of the woods", with our rolling hills, tall trees and thick forest. There are birch, persimmon, oak, pine, juniper, Bradford pear, maple, cherry, and so many others!


This type of card is called a "Waterfall" card. The tab can be added any direction you want, to open the flipping layers. It wasn't hard to make at all! As you pull the tab out, each layer flips over.


The leaves were stamped using different images from the new Chocolate Baroque clear stamp set called Tangled Garden.  I used metallic gold, copper and other inks. The gold leaf was stamped in craft ink onto a piece of gold mat board, then cut out. The sentiment is one from my stash of vellum sayings, and this particular one is from Jim Bishop. The background paper is from a DCWV stack of just photographs, and the solid cardstocks are from a small 3"x3" stack of textured stock from DCWV, and Stampin' Up. I used two eyelets to keep the vertical bar in place, and an eyelet and several different types of cord/fibers for the pull. If you have any questions, please contact us!

Have a wonderful Autumn (or what's left of it now that Thanksgiving is over)! Love that cooler air!

Saturday, October 13, 2012

Gothic Leaf

I love Autumn! I love fall! I love the coolness and the colors! I love Glenda's Gothics!

This Gothic Fragments spire has leaves on it, and was perfect for coloring for fall. I thought the shape looked like a leaf, so I attempted to make it look like one. I used an embossing folder to make the leaf imprint on the two background panels (one of which is a copper shiny cardstock) and used some fall paper from my stash. The ribbon was new - some beautiful glittered ribbon I found at the Dollar Store. I stamped the image in dark green, then used Stampin' Up markers to color the leaves in, and Stampin' Up classic ink pads and sponge daubers to shade in the rest. This was a very easy card to make!


This is the new Gothic Fragments set, and you can go directly
to the page to see and order it by clicking HERE.

 
I used the little pinecone stamp from this new clear stamp set called Ivy Trails.  You can find it by clicking here on the Chocolate Baroque website. 

Thank you for visiting, and I hope you're "fall-inspired"!  My best to you!

Thursday, September 13, 2012

Christmas Creatures

Hello, everyone! Thanks for stopping by!  This new set of stamps, just in time to use for Christmas, is just too cute! I'm getting a head-start on my supply of cards for the holidays! I was going through a broken plastic cardstock and paper container, when I came across this red and white background paper - perfect for these stamps! The stamp set is called Christmas Creatures, (shown below) released this month by Chocolate Baroque! (click on the name, and it will take you directly to the page on the Chocolate Baroque site) I absolutely love owls, and I am a fan of the Snowy Owl. I think this little guy is in need of a trip to the hair salon, though!


I went out into the backyard, and found a little stick to use as her perch. I used a branch punch and cut just two sets of the three "toes" from the ends of the branch for Owl's feet. I cut apart some white turkey feathers from my stash, and glued them in layers over the stamped image. I found some shiny black rhinestones to use for her eyes.

Below, I wanted to show that the mistletoeflake had gotten stuck in the tree branches, and part of it was dangling down over the owl's head. Am I overthinking this? The snowflake is from the Gift of Christmas set, shown below.


I love the fact that this little bird even decorated her small plain tree with a beautiful bauble!


Christmas Creatures


I hope you've enjoyed your visit, leave with some inspiration, and ordered your new clear stamps! You can save some money if you order the two sets as a "Multi-Buy"! Click here to see this offer.


Saturday, September 8, 2012

Chocolate Baroque Stamps - Poinsettia Joy

Hello!   It's not too early to start thinking about Christmas, as it's already September!  Only three months to go! 

Now, don't you just LOVE these images? The Poinsettia flowers and the word "Joy" are from one of Chocolate Baroque's new clear stamp sets, called Joyful Christmas being released this month! The chapel image is from a new clear set called Christmas Creatures. That's one of the reasons I love, love, love Chocolate Baroque stamps - they coordinate so well with other stamps they produce!
The chapel image was heat embossed in gold, then colored in with Stampin' Up and Copic markers.


This card was very easy to make. It consists of two different styles of image, the shadowed chapel image, and the stylized poinsettia's. The ribbon is 1" wide burgundy grosgrain. I hope you've been inspired, and please come back soon for more new and awesome stamps and examples!  Here are photos of the two stamp sets listed above. 
 

Wednesday, July 25, 2012

Pretty Poppies!

Hi, again! It's Poppy time at Chocolate Baroque! With the new release of the Pretty Poppies set, you have some absolutely beautiful stamps to play with, and it's a hard choice as to which one to use first! Just get them all inky! Here's some tags and a bookmark made using the poppy stamps in this set. Enjoy!


 Thanks for dropping by!

Tuesday, July 24, 2012

The Cameo and Dusky Damask

Welcome, friends!  I know I've said this before, but my husband says I should have been born in Victorian times, but only so I could wear the hats, gowns and jewels! I just love the images from that era! They are so romantic!

This “Cameo” image is from Chocolate Baroque, and is just beautiful! I wanted to make it a pretty simple card, but as usual, the more I work at it, the more ends up on it, and it turns into something that looks like I spent hours on! This little lady was discontinued, and I can't think of why, because she's so beautiful! 

I am posting this card because I used a large background stamp from the brand new stamp set, Dusky Damask, from Chocolate Baroque on the inside.  Below is a look at this new set, and you can click on the picture to go to the Chocolate Baroque website for more information, or to order it.


I stamped the image in Memento black ink of white cardstock.  The Tim Holtz Distressed ink, Vintage Photo, and Antique Linen was used to “age” the woman. Just the tiniest bit of lightest pink was placed on her cheeks, using chalk. I used Spellbinders Small Ovals to cut her out, and glued a string of off-white pearls around the cut edges.


The white card base is 10” x 6” tall, and score in half to make a 5” x 6” card, with a side opening. The tan patterned paper is from DCWV cardstock stack called “Linen Closet”. It has an embossed leaf design, and parts of the leaves are shiny, as you can see in the photo. It was cut to 3” x 5”, with rounded top corners, before attaching it to the top of the card base. I cut another white panel to 5” x 6”, and embossed the Marianne plate at the top about 1/8” below the top edge. Using a craft knife, I cut out the “windows”, and around the top of the “fan”. The bottom corners were rounded and this piece was centered over the tan and white card base, after applying the lace and trim. The lace and trim were cut to 6” long, with ends folded over to the back of the white “fan” piece and taped down (or use ribbon adhesive strip).

Next, I die cut one of the 2 ½” wide Floral Ovals out of black cardstock, and placed tan pearls around the border as shown. I cut one of the largest Floral Ovals in white, and placed small tan pearls at the “directional” points shown. I used Scor-Tape in 1/8” wide to attach the ¼” wide black gimp trim to the white oval, just inside the pierced dot area. Dimensional adhesives were used on the back of this oval to attach it to the front of the card, on the lower two-thirds. The Cameo was centered on the black floral oval and glued flat, then this was mounted with dimensional adhesives to the center of the white floral oval. Large tan pearls were placed at the bases of each scallop in the top of the “fan” and small tan pearls at the points of each arch below that.

The flowers and leaves were punched from a scrap of the tan embossed patterned paper and the black cardstock. They were assembled with glue after shaping them with an embossing stylus and foam pad. A tiny butterfly was used as an accent.

The inside of the card was stamped in the Distressed Vintage Photo ink using one of the larger background stamps from the Chocolate Baroque set, Dusky Damask. I used a small sponge dauber for the edges in the same ink, and added a little of the Antique Linen on the edges.


I really enjoyed making this card, and I’m sure you will too!  The supplies needed to make it are listed below!

Chocolate Baroque stamp sets – Dusky Damask
    Stampin’ Up – white and black cardstock, Flower punch
    DCWV Linen Closet pad – tan embossed patterned cardstock
    Memento black ink
Tim Holtz distressed inkpads – Antique Linen and Vintage Photo
Spellbinders dies – Small Ovals, Floral Ovals
Anja style embossing stencil – fan
Wright’s fused pearls strand
Zva pearls – small and large, tan
6” Large “Victorian” lace, cut to fit (5”)
    6 ½” tan trim from stash
    Punch Bunch – small flower and leaf punches
    EKSuccess – flower punch
    Craft glue that dries clear, sponge dimensional adhesives,
          tape runner or tape strip
    Embossing pad and stylus
    Scor-Pal
    Die cutter
    Scissors

Wednesday, June 13, 2012

Poppy Seeds

 Good morning!  I hope you are doing well!  Here's a bright and colorful card to cheer anyone!  A friend gave me the white oval and white butterfly diecuts, and the poppy red was really striking against the white and dark green.  This poppy stamp is from Chocolate Baroque's set called Flora & Fauna.  If you click on the name, it will take you directly to that location on Chocolate Baroque's website.  The complete set is just beautiful, and I can't wait to use each and every flower and butterfly!  I don't know what it is about poppies, but they are irresistable to me!  Copic markers were used to color the flowers.


You can see a little of the sparkle and shine on the flowers in this photo.  I used Copic's At You Spica glitter pens to add it.  The red swirled background paper is from a DCWV spring stack.

I hope you've enjoyed your visit, and I look forward to seeing you again! 

New Chocolate Baroque Stamps! Amazing!

Chocolate Baroque continues to amaze many people with the new stamps they are producing!  I'd like to share some of my projects made with some of the new stamps, and I'd appreciate your comments at the bottom of the post.  Thank you, and I hope you enjoy!  Please feel free to contact me if you have any questions!

These are from the Sunny Sunflowers set. 


I stamped the images on white cardstock, with Only Orange ink from Stampin' Up.  The shading was done with Copic markers.  The background is from a summer stack of paper, and I used two embossing folders on the white panels.  Pearl brads completed the centers.  The bottom border was a die cut given to me by a friend, and the word, "Happy" is from the Chocolate Baroque Artistic Expressions set.  I don't have any sentiment stamps from Chocolate B yet, so I used one from my collection.  I love the patterned background paper, so I cut a thin strip 1/4" wide, and wove it through the eyelets on the border strip.   

More to come...

Tuesday, May 29, 2012

May 2010 Heartfelt Creations Blog Hop

Good morning! Welcome to the May 2012 Heartfelt Creations Alumni Team Blog Hop! I hope everyone had a wonderful Memorial Day weekend. There are seven of us "Alumni" playing in the Hop this month - it's a busy time for many, with summer starting, kids getting out of school, vacations, etc. What plans do you have?


The Hop started at 8am EST today and closes Friday, June 1st at midnight - one fortunate person will be chosen at random from all of the blog comments to win a $25 gift certificate to shop at Heartfelt Creations! We will all try to announce winner on our blogs by noon on Saturday, June 2nd. The winner just needs to email Emma Lou at emmalou@heartfeltcreations.us with "winner of May Alumni Hop" in subject line. Good luck!


Prior to dropping by here, you may have come from Tesa's wonderful blog. Below is the blog order, just in case you were derailed, sidetracked, rerouted or detoured. (I didn't know there were that many words to say the same thing! lol But then, that's American English)


http://clarespaperworks.blogspot.com Clare <---------YOU ARE HERE!

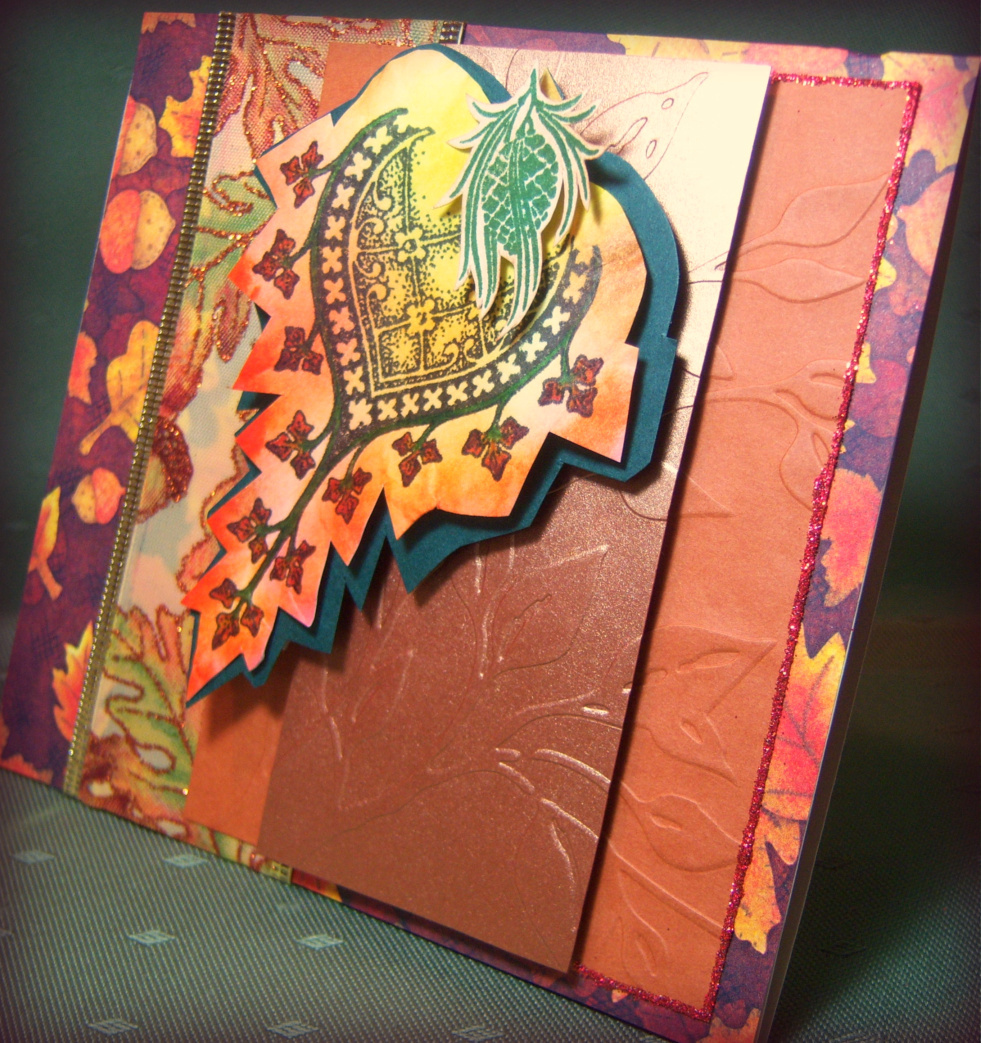
Here is my May creation, and I wanted it to be bright and cheery to reflect Spring and the coming bright summer. I didn't know until I was linking Lisa's blog to mine, that she and I, out of all the different stamps available, chose the same set to use! Great minds!

Something cheery - This cardstock was just the thing when I saw it!

I found little spools of this sparkly ribbon at Joann's, in several bright colors


This card was very easy to make. The supply list follows the directions.
Cut the base of the card from the striped cardstock, which has a white backing. I used an 8" x 8" pad, used the complete width of the cardstock, and trimmed 2" off one end to make the card 6" tall. I folded it in half the 8" x 8" way making the completed card base 6" tall by 4" wide. I used a corner punch on the corners.
Using the Spellbinders die set Labels 10, I cut a large one from white cardstock, and one the next size smaller in the yellow patterned paper. Adhere together, yellow on top of white, centering. Use dimensionals to apply this to the main card base, centering both directions.
Using the largest of the two stamps in the set HCPC 3325 Daisy Patch Bouquet PreCut Set, stamp one in Memento black ink on white cardstock. Color with the Copics listed below, or your preferred markers. Fussy-cut the image out, including three of the stems on the very outside of the image. Apply this to the center of the raised Label with dimensionals, then glue seed beads to match striped cardstock to flower centers, using white glue that dries clear. I tied a bow using my Bow-Easy, and adhered it centered over the flower stems with ribbon adhesive. Let dry, and your card is ready to cheer someone up!

Supplies:
  • Heartfelt Creations HCPC 3325 Daisy Patch Bouquet PreCut Set
  • Spellbinders Labels 10
  • DCWV Glitter Stack, 8" x 8"
  • Stampin' Up white cardstock
  • Copic markers YR12, Y13, Y19, G09, YG06, YG03
  • American Crafts Glitter Ribbon in Cabbage
  • Seed beads from stash
  • "Peacock" corner punch - Fiskars
  • white glue that dries clear
  • dimensionals
Next on the blog hop is the talented Lisa! I hope you've enjoyed your visit, and I know you'll love the rest of your blogging trip! I've enjoyed having you, and don't forget to leave a comment on each blog so that you are entered into the drawing - we also just love to read your comments! Check back here or any of the other blogs on Saturday to see if you're the lucky one with the $25 gift certificate to Heartfelt Creations! Have a great day!

About Me

My photo
Lebanon, TN, United States
I am a child of God, wife, mother of three, and gramma of six. I enjoy stamping, scrapbooking, beading, photography, sewing, camping, fishing, hiking and life! I am a retired dog groomer. Denver, Colorado, is where I was born and raised. I miss the snow and drier weather.


Blog Archive