
Hello! What is summer without lots of flowers? I have been in a flower frenzy! It seems certain things go in spurts, but this spurt seems to be lasting all summer... I hope you're having a wonderful summer, and autumn is next month, already!
It seems Blogger has changed the format for blogging, and I haven't figured it all out yet. The next several posts are all flower related, and I apologize for having so many "single" cards - I meant to put them in one post. Please check each one out!
This one is an Indian floral card, using yellow, purple, lavender, celery green and blue patterned paper. The floral image is a stamp from Chocolate Baroque, and was heat embossed in white on dark purple cardstock. It looks more like blue in this photo, but it is dark purple.

Welcome!

Monday, August 7, 2017


Tuesday, February 21, 2017
Remodeled Craft Room
Hi! Welcome to Clare's Paper Works! I have some exciting news!
Blessings came raining down on me the last six months! My husband is mostly to blame, but there was a lot of help from my son and daughter-in-law. I had saved some money from babysitting, but my hubby added to it when we went to a store called ModerNash, here in Nashville, TN. They sell IKEA products, and have a showroom, where Mike and I went to look around. The nearest IKEA store is in Atlanta, GA. We bought desks, storage towers and roll-around storage cabinets. I found a new leather office chair on clearance at Office Max. We spackled, repaired and painted. shampooed the carpet, which will eventually go, then we all spent a full day of assembling, and arranging the room. I am so happy with how it turned out! The only thing I didn't do was take "before" photos for comparison! Here's my new craft room!
Thanks for visiting my craft room! I hope you'll come back soon! If you are local, come and play!
Blessings came raining down on me the last six months! My husband is mostly to blame, but there was a lot of help from my son and daughter-in-law. I had saved some money from babysitting, but my hubby added to it when we went to a store called ModerNash, here in Nashville, TN. They sell IKEA products, and have a showroom, where Mike and I went to look around. The nearest IKEA store is in Atlanta, GA. We bought desks, storage towers and roll-around storage cabinets. I found a new leather office chair on clearance at Office Max. We spackled, repaired and painted. shampooed the carpet, which will eventually go, then we all spent a full day of assembling, and arranging the room. I am so happy with how it turned out! The only thing I didn't do was take "before" photos for comparison! Here's my new craft room!
 |
| This is right inside the door (to the left) of the small extra bedroom we used for this craft room. We took the closet doors off and replaced them with curtains matching the ones over the single window in the room. There are metal shelves in the closet and this is where all of my sewing, fabric and accessories are stored. |
 |
| Swinging to the left next to the closet is a large white cabinet which stores stamps in boxes, stamps in plastic storage folders, scrapbooks, gift boxes and photographs. Next to that are two of the IKEA storage cabinets, one on top of the other. These hold stamps, glitters, embossing powders, clear mailing boxes, all sorts of 3-D embellishments, bubble wrap, boxes of brads, dry embossing tools and pads, eyelets, etc. Mike is going to mount a different Ott light onto the table to get the black one out of the way. I ordered stamp pad and marker storage from Stamp-n-Storage, along with two wooden boxes to store dies on magnetic cards. These are fantastic! Below the desk is another roll-around cart that contains plastic boxes of 12" x 12" cardstock and paper. Each box is separated into a subject, i.e. Christmas, Autumn, Spring, Patterned, Solid, etc. In the corner is a tall IKEA unit with deeper drawers, where there are flowers, rhinestones, punches, embellishments and other necessities stored. Above this unit are three curtain rods mounted on the wall, where some of my punches are placed. |
 |
| My bead case is in front of the window. |
 |
| Another tall storage unit with deep drawers in not quite in the corner. My sewing machine, sewing tack box, serger and threads are stacked in the corner. The unit has ribbon stored by color in each drawer. My computer printer is on top. Then comes the desk, and has a basket of scrap material underneath and a trash can. On top is a five-drawer storage box for scraps of paper and a carousel of punches on top. Below the desk to the left is another square rolling storage cabinet filled with beading supplies, envelopes, paper, punches and Cricket cartridges and cords. Decorative boxes on top hold photos and paper packs, and the tall storage unit on the end holds address books, envelopes, stamps, buttons, lace and more ribbon by color. The main colors of the room are a comfortable and welcoming peach, light teal and white. |
Thanks for visiting my craft room! I hope you'll come back soon! If you are local, come and play!
Thursday, February 16, 2017
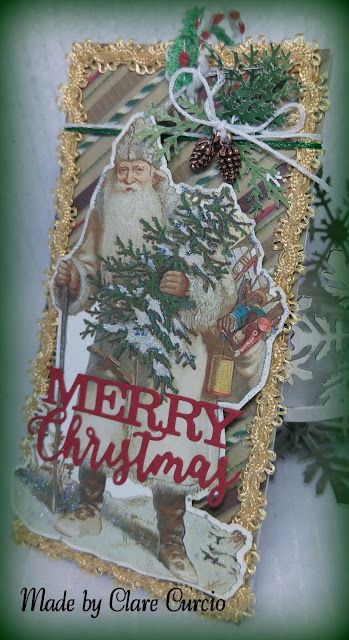
Vintage Christmas Tag/Card
Hello, again! I meant to post this just after Thanksgiving, but didn't get to it, so here's a Christmas tag/card in February. It won't be long before it'll be time to work on Christmas cards again.
This tag/card is one of my favorites! I remember visiting some friends of my parents when I was little, and we all had to carry something in to their house. A gift, or cookies, or fruit basket, or peanut brittle. Do you ever wish you could go back for another glimpse of then? This image is copyright-free and I'm using it a lot this year. I'm designing a whole tree full of just vintage ornament-tag-cards.

Thanks for stopping by! Have a great weekend!
This tag/card is one of my favorites! I remember visiting some friends of my parents when I was little, and we all had to carry something in to their house. A gift, or cookies, or fruit basket, or peanut brittle. Do you ever wish you could go back for another glimpse of then? This image is copyright-free and I'm using it a lot this year. I'm designing a whole tree full of just vintage ornament-tag-cards.

Thanks for stopping by! Have a great weekend!
Friday, November 18, 2016
Vintage Christmas Ornaments
Hello, everyone! Thanksgiving is next week - already! I know we say it year after year, but the older I get the faster time flies! How is that? I turned 60 in September, and I think it's messing with my mind because I'm starting to feel 60. Not ready for that quite yet! I still have a lot of living to do, God willing!
This year, I thought I'd do something a little different. Every handmade Christmas card I sent out last year and years previous said nearly the same thing. This year, I'm making vintage looking Christmas ornaments that serve as both a card and ornament. Several people have told me that my cards are gifts in themselves, and frameable, so this will make them useful, hopefully for many years to come.
I started with some printable, non-copyrighted vintage images from online and a cd I have. They were printed from my computer. I cut thin chipboard, then covered it with Christmas background paper on both sides. Playing with the images has been fun, and there were so many different kinds of trims, ribbons, buttons, etc. in my stash, that there almost too many to chose from! Glitter, sparkly nail polish, Crystal Effects (SU) all added to the pizzazz! Velvet ribbon, satin ribbon, cording, thin twine and thread were also used.
I found some clear plastic mailing boxes online, at a spectacular deal, from a company called Clear Image, Inc. dba Clearbags. They have so many sizes that will hold any size card, and come in different thicknesses to accommodate your 3-dimensional cards! I had seen these, and found them for sale other places, but this company is by far the cheapest, for the most boxes.
This first ornament was so fun to make! I love the vintage Santa image. I touched the color up on him using markers, including making his cheeks pink! He is popped up with some dimensional foam tabs. Some sparkly glitter nail polish was added to the snow on the tree and around his feet. Stampin' Up has some little pine cones that were perfect for an embellishment. Several strands of different cord, ribbon and twine were used for the hanging addition.

This second ornament includes some snowflake die cuts out of silver and blue sparkle cardstock, a rhinestone center, a beaded snowflake, pearl strand and shiny ribbon to offset this sweet girl. She really looks like me as a child!
Thank you so much for visiting! I hope your Thanksgiving is wonderful! I'm thankful for you!
This year, I thought I'd do something a little different. Every handmade Christmas card I sent out last year and years previous said nearly the same thing. This year, I'm making vintage looking Christmas ornaments that serve as both a card and ornament. Several people have told me that my cards are gifts in themselves, and frameable, so this will make them useful, hopefully for many years to come.
I started with some printable, non-copyrighted vintage images from online and a cd I have. They were printed from my computer. I cut thin chipboard, then covered it with Christmas background paper on both sides. Playing with the images has been fun, and there were so many different kinds of trims, ribbons, buttons, etc. in my stash, that there almost too many to chose from! Glitter, sparkly nail polish, Crystal Effects (SU) all added to the pizzazz! Velvet ribbon, satin ribbon, cording, thin twine and thread were also used.
I found some clear plastic mailing boxes online, at a spectacular deal, from a company called Clear Image, Inc. dba Clearbags. They have so many sizes that will hold any size card, and come in different thicknesses to accommodate your 3-dimensional cards! I had seen these, and found them for sale other places, but this company is by far the cheapest, for the most boxes.
This first ornament was so fun to make! I love the vintage Santa image. I touched the color up on him using markers, including making his cheeks pink! He is popped up with some dimensional foam tabs. Some sparkly glitter nail polish was added to the snow on the tree and around his feet. Stampin' Up has some little pine cones that were perfect for an embellishment. Several strands of different cord, ribbon and twine were used for the hanging addition.


This second ornament includes some snowflake die cuts out of silver and blue sparkle cardstock, a rhinestone center, a beaded snowflake, pearl strand and shiny ribbon to offset this sweet girl. She really looks like me as a child!
Thank you so much for visiting! I hope your Thanksgiving is wonderful! I'm thankful for you!
Wednesday, August 3, 2016
Hello, Again, Friends!
Hi, there! I'm so glad to see you! I haven't posted for a while because my craft room was being renovated and modernized, of which I'll post pictures another time. I've been going on business trips with my husband, too. He's been working in adjoining states to Tennessee, so we've been able to do a little camping in our fifth-wheel trailer rather than stay in a hotel. It's a blessing for us to spend more time together, and his employer pays for the camp ground space - saves them money, so it's a Win-Win for all of us. It's been fun!
I've been creating a few cards using a dusky rose shade and brown cardstock, which is becoming a favorite combination of colors for me. I really like the feminine, vintage feel of some of them.
 The card above was very easy to make using the Spellbinders Grand dies for the card itself. I cut a piece of white cardstock, overlapping the top edge of the die slightly, so that I didn't end up with two separate pieces, but that the card was still attached along the top. The dusky rose background piece was adhered to the brown patterned base mat after applying the lace. These two layers of colored and patterned cardstock were adhered over the white base. The word, "friendship" from Stampin' Up was stamped in brown ink below the white lace. I punched out some leaves and shaped them with an embossing stylus, then glued them along the lace roses, using pop-ups. And voila, finis!
 The image on the above card was double-stamped in Stampin' Up Smoky Slate ink on white cardstock, and both images were colored in using Stampin' Up markers. The top layered image was fussy-cut out, and applied with pop-ups. The swirly die cut at the bottom of the pink card base is from Heartfelt Creations, called Regal Borders and Pockets. The white die cut image is from Spellbinders, called 5 x 7 Detailed Scallops. I roughened up the edges of the card a little, added some lace across the bottom, just below the lower edge of the Scallop die cut, and added a little bow made from white sheer 3/8" ribbon.

I've been creating a few cards using a dusky rose shade and brown cardstock, which is becoming a favorite combination of colors for me. I really like the feminine, vintage feel of some of them.


This last card is a 5 x 7" dusky rose background on white cardstock, with a brown patterned base cut with Spellbinders Nestabilities Art Deco. These two were adhered directly to the white cardstock base, with some white lace applied across the top, centered on the card. The white die cut is from Spellbinders called Reflection, which reminds me of a vintage mirror frame. The sentiment was stamped in black, and is from my stash. The rose leaves were cut from some plastic roses I had left over from wedding decorations, and fit well with the purchased paper roses. The little black flowers were from my stash, and are fabric. The white paper-covered wire was twisted around a pair of jewelry pliers and glued in place. The butterfly was cut out twice, using the wonderful die from Impression Obsession, and the top one was popped-up for dimension.
Thank you for stopping by - I hope your summer has been a great one! It's been hot here in Tennessee, with quite a bit of rain. Happy creating!
Monday, April 4, 2016
Heartfelt Sympathy
Hello! There's no easy way to talk about the deaths of loved ones, and there have been several in the lives of a few friends recently. As I blogged about before, the colors of white, coral and light green have been favorites of mine lately - a guess kind of like a famous painter once painted only pictures with blue, during his "blue period". I'm in my white, coral and green period!
I found the colors to be very soothing, and the flowers instantly caught my eye on a recent Pinterest post. They were so easy to make! Punch out circles of different sizes; I did three of the large, two of the medium, and one small. With a few scoring lines, some ink on the edges of the circles, both sides, and some folds, you can make a whole garden of flowers! They remind me a little of morning glory - that's it! I'm going to start my "blue period" with these flowers in blue! I punched out some green leaves, and used them on the bases of each petal, and glued them down. Overall, this was a very easy card to make, but looks like it took some time. Make extra flowers to have on hand!
I used a little 1/8" wide green ribbon for stems, two die cuts for the white background and tag, and the stamps are from Stampin' Up.

I found the colors to be very soothing, and the flowers instantly caught my eye on a recent Pinterest post. They were so easy to make! Punch out circles of different sizes; I did three of the large, two of the medium, and one small. With a few scoring lines, some ink on the edges of the circles, both sides, and some folds, you can make a whole garden of flowers! They remind me a little of morning glory - that's it! I'm going to start my "blue period" with these flowers in blue! I punched out some green leaves, and used them on the bases of each petal, and glued them down. Overall, this was a very easy card to make, but looks like it took some time. Make extra flowers to have on hand!
I used a little 1/8" wide green ribbon for stems, two die cuts for the white background and tag, and the stamps are from Stampin' Up.

 |
This card was cut using a grand label die and I mounted the whole thing on a
piece of coral matting cut with the same but 1/8" larger, if you can visualize that. I started punching circles of three different sizes, and just kept going! I took the picture
then realized the card needed something, but forgot to take another picture
of it before it was put in the mail. Oops! Another very easy card to make!
I'd love to see you try one, and send me a photo of yours!
|
Sunday, April 3, 2016
Thinking of You
Hi, there! Once again, I'm working with the colors celery green, coral and white, but have now expanded the same cardstock pad with black and yellow added. There is a little layering of different cardstock patterns and colors, and since the patterned cardstock is double-sided, the corners added interest when folded. The sentiment is from Stampin' Up in black, as well as the floral image, heat embossed in white, then colored with markers. Love that seam binding in mustard!
All my best to you and yours! Happy Spring!

All my best to you and yours! Happy Spring!

Happy Spring!
Well, Happy Spring to everyone! In my last post, I mentioned how celery green, coral, white and cream go so well together. Here is another example of that, but with a slight variation of green. I love the die cut, and found it even prettier with the ribbon woven through it! This gave the card so much more dimension and appeal! The cardstock, ribbon and stamp are all from Stampin' Up.
The weather is gorgeous right now, here in Nashville, TN. Give it a minute, and it might change, but at this moment, it's great! Wild violets have bloomed all over my backyard, my tulips have bloomed after the grape hyacinth's, and the crocus are long gone. The Starflowers are about 5" tall, and I see the beginnings of the Four O'clocks peaking out from the dirt. There's a new bird nest in my birdhouse on the tree, but no eggs yet. Enjoy your beautiful Spring!


The weather is gorgeous right now, here in Nashville, TN. Give it a minute, and it might change, but at this moment, it's great! Wild violets have bloomed all over my backyard, my tulips have bloomed after the grape hyacinth's, and the crocus are long gone. The Starflowers are about 5" tall, and I see the beginnings of the Four O'clocks peaking out from the dirt. There's a new bird nest in my birdhouse on the tree, but no eggs yet. Enjoy your beautiful Spring!


Hello, Again!
Hello, my friends. I haven't blogged in a while due to being sick with a sinus infection that just wouldn't go away, then a surgery, and am recuperating from that and sick again with a virus, all in my chest and throat. It's been one of those winters where almost all of our family has been sick with something off and on - my husband contracted Influenza B, which turned into pneumonia, the little ones with colds, ear infections, pink eye and viruses, to sprained ankles, procedures, new diagnosis's and medications. The little ones (grandchildren) have shared several of these after bringing them home from school. Now, it's allergy time! Yay!
Some of my favorite colors this Spring have been a celery green, coral, white and ivory. A friend gave me a stack of cardstock with those colors in it, and it has been a blast matching and creating with them. This is a very simple card with layering of different patterned and plain colored cardstocks. The image is one from Stampin' Up, which I colored with markers, then stamped. I like the patterns and water-color effects it created.
Thank you for visiting, and I hope it's as beautiful where you live as it is here, in Spring!

Some of my favorite colors this Spring have been a celery green, coral, white and ivory. A friend gave me a stack of cardstock with those colors in it, and it has been a blast matching and creating with them. This is a very simple card with layering of different patterned and plain colored cardstocks. The image is one from Stampin' Up, which I colored with markers, then stamped. I like the patterns and water-color effects it created.
Thank you for visiting, and I hope it's as beautiful where you live as it is here, in Spring!

Friday, January 15, 2016
Thank you!
My daughter and her family traveled to Florida over the holidays, and had such a great time visiting her husbands extended family. The weather was awesome, warm enough to swim in the pool and ocean! She asked me to make three thank-you cards. Here they are.
The cardstock on the two pink rose cards is from Our Daily Bread Designs, and the purple/blue one is from cardstock and paper I had on hand. I used some purple metal roses I had in stock from Fire Mountain. Lace, beading and ribbon add a touch of sweetness.

The cardstock on the two pink rose cards is from Our Daily Bread Designs, and the purple/blue one is from cardstock and paper I had on hand. I used some purple metal roses I had in stock from Fire Mountain. Lace, beading and ribbon add a touch of sweetness.

 |
| If anyone has a suggestion on how to get the ribbon to lay straight and even across the top, I'd sure love to know! |
 |
| The sentiment is from Stampin' Up. |
Subscribe to:
Posts (Atom)
About Me

- Clare
- Lebanon, TN, United States
- I am a child of God, wife, mother of three, and gramma of six. I enjoy stamping, scrapbooking, beading, photography, sewing, camping, fishing, hiking and life! I am a retired dog groomer. Denver, Colorado, is where I was born and raised. I miss the snow and drier weather.


