Free background from VintageMadeForYou

Welcome!

Welcome!

Tuesday, January 31, 2012

January Heartfelt Creations DT Alumni Blog Hop


Hello, dear blog friends!  January is nearly gone already and Valentine's Day is just around the corner!  Can you believe it?  Slow down, Time!  We're here with another Heartfelt Creations blog hop, and I know you'll enjoy all of the gorgeous creations from our alumni design team members, but also receive some incentive and inspiration to get stamping and creating!  What better way to spend these gray, dreary days of winter, than doing what you love?  These ladies never fail to amaze me!  Don't forget to visit the Heartfelt Creations blog each Wednesday to see the current design team's projects, and watch for new products being introduced!

The hop starts on Tuesday, January 31st, at 8:00 a.m. EST - it will close on Friday, February 3rd, at midnight. 

There will be one lucky person chosen at random from all the comments on the blog hop to receive a $25 gift certificate from Heartfelt Creations!  All you have to do is visit each designer's blog and leave some love in the comments section!  Emma Lou at HFC will do the rest, and we'll all try to announce the winner on our blogs, on Saturday, February 4th.  If you're the lucky one, just email her with "winner of alumni hop Jan 31" in the subject line.  Good luck to each of you!

Here's the list of Heartfelt Creations alumni designers - just leave a comment on each blog after you enjoy the creative beauty of each entry.  I know I can speak for all of us - we love your comments, and look forward to hearing from you!  We are also thankful for each of you! 

The blog started here:

Olga http://craftieodamae.blogspot.com
Selma http://selmasstampingcorner.blogspot.com/
Loretta http://lovetocreate.blogspot.com/


You are here:   Clare http://clarespaperworks.blogspot.com


My encouragement card is 4 7/8" wide by 6 1/4" high, and was very easy to make!  I started with plain white cardstock scored and folded to the above measurements.  I cut a piece of black cardstock 3 5/8" wide by 6 1/4" high and adhered that to the left side of the front of the white card base.   I used Tim Holtz Vintage Photo Distress Ink and a sponge dauber to "age" the remaining white cs showing on the right side of the front panel.


Prior to assembling the card base and panels, I made the flowers, and set them aside to dry.  I used Heartfelt Creations HCPC 2293 Aztec Gold Sunflowers 2 Precut Set (2 of smallest) and HCPC 2294 Aztec Gold Sunflowers 1 Precut Set (2 of largest, 3 of medium, and 3 of small) to stamp the flowers in Versafine Onyx ink on fuchsia cardstock from the Black Currant Stack by DCWV.  (This is gorgeous cs!)  I hand-cut (or some call it fussy-cutting) the flowers, since I don't own the Blossom 2 Nestabilities dies from Spellbinders that matches these stamps.  I used pink glitter nailpolish on the tips of each flower petal (and the butterfly's antenna) then painted all the flowers but 1 med and 1 small of  Precut Set 1, with glossy Mod Podge, and let dry.  On two of the smallest flowers, I glued black chunky glitter to the centers. 

I cut a piece of the floral foiled cs from the Black Currant stack, 6" high by 4 1/2" wide.  Before adhering it to the front of the white cardstock base, I glued a scrap piece of the fuchsia cs (measuring 1" high by 4 1/2" wide, across the bottom of the floral foiled piece, about 2/3 down from the top.  About 1/3 of the way down on the front of the floral cs, I glued a piece of black scrap cs 3 1/2" wide by 1 1/2" high horizontally on the left side, with the right edge trimmed with fancy scissors.  I adhered a piece of pink vellum vertically down the center of the card front, measuring 6" high by 1 7/8" wide.  Over this I glued a stem and leaves diecut, which was cut from white cs, and I used Tim Holtz Vintage Photo distress ink to "age" the paper.  I cut a 9" length of 7/8" wide black grosgrain ribbon, tied one side into a bow, and looped part around the stem diecut, loosely twisting it and taping both loose ends to the back of the floral foil panel. 


At the tips of the leaf stems, I glued the flower bases, and used dimensional pop-dots to layer all of the flower layers.  Two largest, two medium, one small, one smallest, and the smaller flower was one small and one of the smallest glued together.  The two smallest are the ones with the black chunky glitter.  My good friend, Donna, was kind enough to diecut the leaf stem and the butterfly layers for me!  These really added a nice touch to this card.  Thank you, Donna!  I glued the white butterfly diecut just in the center of the body to the pink base, and applied the tiny pink rhinestone.  I gently bent the white wings up.  The antenna had been previously painted with pink glitter nailpolish.  (I like using nailpolish, because of its acrylic base, and unlike glue and glitter alone, when the polish is dry, the glitter doesn't flake off)  I adhered the butterfly with Aleene's Tacky Glue just on the points of the butterfly where it came into contact with the larger flower.  Adhere entire front panel to card base centering it on all sides, leaving a 1/8" border all around. 


On the inside of the card, I used a next to largest Spellbinders die from the Labels 5 set to cut the white cs panel.  Then I used the small and medium stamp from the precut set 2 along with Stampin' Up's Marvelous Magenta classic ink to stamp the flowers on it.  I used the Psalm 3:3 stamp from my stash for the sentiment.  For layering, I cut one of the largest diecuts from the Spellbinders Fleur De Lis Motifs set out of the pink vellum, and applied it to the center of the left inside.  Adhere the sentiment piece offset to the lower right, and glue flat the two accent flowers.  The black cs border is punched with a Martha Steward punch from a scrap.

I had a lot of fun making this card.  I really like making the 3D images.  Thanks again, Donna, for the diecuts!  If you have any questions at all, please contact me!

Next up is the uber-talented and creative Carla - just click on her link to go to her blog and see her beautiful creations!

Carla http://carlasstampingspot.blogspot.com
Marsha http://www.stampingdownsouth.blogspot.com/
Linda http://paynehollercards.blogspot.com

I have another posting I need to get done, so I'll close for now - I just want to wish you good luck, and happy stamping!  Thank you, Heartfelt Creations!

Tuesday, January 24, 2012

For Paisley


Hello, blog friends!  The weather here in Tennessee has been crazy warm, and we have had no snow this year!  It was 73 last night in Memphis when the severe thunderstorms went through.  I must have been really tired, because they didn't wake me up!   It is January 24, 2012, a Tuesday, and it is near 60* outside, and I have daffodils ready to bloom!
This card is for a little girl at church, named Paisley.  She has a terminal disease called Neimens Pick Syndrome, a very rare condition similar to Alzheimers, where the nervous system shuts down over time.  I just wanted to cheer her up, and this image from Nicecrane Designs was cute for a little girl.  The yellow, peach, green, white and blue together just looked cheery to me.


This ribbon makes the most beautifullest bows!  If you'd like some, I have about 30 rolls of it!  Just email me.


My friend, Donna, has supplied me with many diecuts, and the white one here is one of them.  It just frames this picture nicely!


The flower die I used for these I got from Joan's Gardens, but I don't remember the name of it.  I love the way they turned out, and the stamens I found in the cake decorating department of Joanns.


I found this cute little lamb stamp in amongst some other small ones from Stampin' Up.

Here is a complete list of materials I used: 

Spellbinders Grand Scalloped Ovals and Nested Oval Medallion Labels dies
Wrights Prestige Moire Ribbon, white, 1 1/2" wide
Heartfelt Creations HCPC 3372 Dutch Iris Frame Precut Stamp (sentiment)
Diecut frame from friend, Donna
Stampin' Up - cardstock, Lamb stamp
DCWV - Glitter stack cardstock
Pearls from my stash
Ink - Versafine Onyx
Dragonfly from stash
EK Success-Scalloped Flower border punch

I'd love it if you'd leave a comment!  I love hearing from you!  Thanks for visiting!

Saturday, January 21, 2012

Happy Birthday, Grace!


Aren't these two babes precious?  The little one kind of looks like I did as a baby.
I just love vintage and Victorian style things of all kinds!  From old pictures, to eyeglasses, to cameos, to watches, to perfume bottles, to embroidered linens,
and on and on... These little gals were in black and white, and I really love the technique of
adding just a hint of color to the focal image.  That's what I did here.  There
are many components to this card, but I don't have time to go into them all at this
moment.  Please email me if you have any questions - I will be more than happy
to answer any you may have.    The lacy oval above was diecut and sent to me by my
good friend, Donna.  I don't know the name of it, but I'll find out.


I used a new die I just got for making these tiny roses.  The more I make,
the better they look, and the rosebuds are so precious!


These little flowers remind me of some that I made for a wedding cake.


Well, I hope you had a wonderful birthday, Grace!  That, along with your hubby's good job
news has made your week a great one!  And as you said, "Praise the Lord!"


This card is going in the mail to you, Grace, so keep an eye out for it!
Happy New Year, Happy Birthday, Grace.
Congratulations to Alan!

A Happy New Year!


Hello, friends!  Happy New Year!  I know it's nearly a month late, but hey,
better late than never!  This darling image is from Nicecrane Designs, a digi-stamp
company that I have the honor of designing for.  Ignacio does such a wonderful job
putting digital images together in kits.  They are awesome!  So many to choose from,
but all exquisite!  Thank you, Ignacio!


I used a couple of new dies I just got, and they are really nice!  The layered pieces and
the roses are cut from dies.  The lace I got at a local craft and sewing store, and I
absolutely love, Love, LOVE it!  My husband is right when he says I was born in
the wrong era!  Vintage or Victorian are my style!


If you have any questions, please contact me - I'll be glad to answer any and all! 
I'd love it, too, if you'd leave a comment - I really want to know what you think! 
Thanks for stopping in, and HAPPY NEW YEAR to you and your family!


Saturday, December 17, 2011

Merry Christmas, All!

Happy and Merry Christmas, All!  I wish each one of you a very wonderful holiday!  Not to start anything political, I just wanted to say that as a Christian, I say Merry Christmas to everyone.  As I'm sure everyone has heard before, without Jesus Christ, there would be no Christmas.  I truly believe this, and that the holiday should be remembered for Him, not Santa, and not just for giving and receiving gifts!  I'm not saying that I don't like to get gifts, nor that I don't love giving presents to others.  It shouldn't be the primary focus of this special day of our Lord.  If some parents choose not to bring their children up in a Christian atmosphere at home, then call your holiday, Santasnight or something like that.

I am originally from Denver, Colorado, and we didn't always have a white Christmas, but we surely had more white Christmases than we have here in Tennessee!  I miss Colorado, and the snow.  I remember building snowmen and making snow angels.  This card was created through wishful thinking.  It is chilly outside, but not cold enough to snow.  I also wanted to see how many Spellbinders dies I could use that went together for this snowflake.

I wish each one of you a very blessed Christmas, and a prosperous and healthy New Year! 

Wednesday, November 23, 2011

HAPPY TURKEY DAY!

Wishing each and every one of you a wonderful Thanksgiving Day, with many treats, eats and blessings!  I'm thankful for each of you!

Nicecrane Designs 50% Off SALE!

My friend, Ignacio, is offering 50% off all of his digital designs!  This special sale is now through November 25, Friday!  Take advantage of this awesome savings to get some unique and beautiful, or just fun and playful digital images for your cards, scrapbooks, or whatever you fancy!  He has some gorgeous pictures of children at Christmas, the little darlings below, and much, much more!  Just click on the picture below to go to his website!  You won't be sorry!

Here's a photo of one of my cards using a digital image from Nicecrane Designs.

I call this card, "Walking the Babies".  It's so precious!


Little Mother Save Pack

A new DIGITAL STAMP,,,,,by the famous play by my favorite childrens illustrations All my Digi-Stamps are in a very High Resolution,,,,so you you can...


Little Mother Save Pack II

A new DIGITAL STAMP,,,,,by the famous play by my favorite childrens illustrations All my Digi-Stamps are in a very High Resolution,,,,so you you can...


I call this image "Little Mother" - she's so cute, feeding her doll with a huge spoon!


This is a bookmark made with an image from Nicecrane Designs' Mother Goose bookmarks.  http://nicecranedesigns.com/index.php?main_page=product_info&cPath=9&products_id=500

Here's Nicecrane Designs Vintage Typewriter Machine - just click on the link below to see a description and photos of all the "typing's" that you can add to it!


Tell Ignacio that Clare sent you!

Tuesday, November 8, 2011

Happy Fall, Y'all!

Hello, blog friends!  I am so happy that Autumn is here!  This cooler, more colorful time of year is my favorite!  Summer is too hot and humid for me, and I don't take the heat well.  I don't tan, just burn in no time at all!  God's beautiful palette of colorful leaves is just gorgeous, and I can't tell you how many colors there are!  To celebrate this beautiful time, I made some cards having to do with pumpkins, my most favoritous "squash" of this time, especially as pie!  Or bread, or soup, or muffins, etc.!  Can't you just smell that wonderful cinnamony pumpkin scent all over the house?  I can - could be because my daughter just used one of the pumpkins we bought for Halloween, and made little chocolate chip pumpkins loaves for a bake sale at church!  hehe  They are soooooooooooo good!  You wouldn't think chocolate chips and pumpkin would go well together, but it's almost, I said ALMOST as good as chocolate and peanut butter together!

Well, with no further ado, here are photos of my cards.  I hope you enjoy!  Thanks so much for visiting, and please know that I really appreciate you taking the time to check in!  Happy Fall, and Happy Thanksgiving!
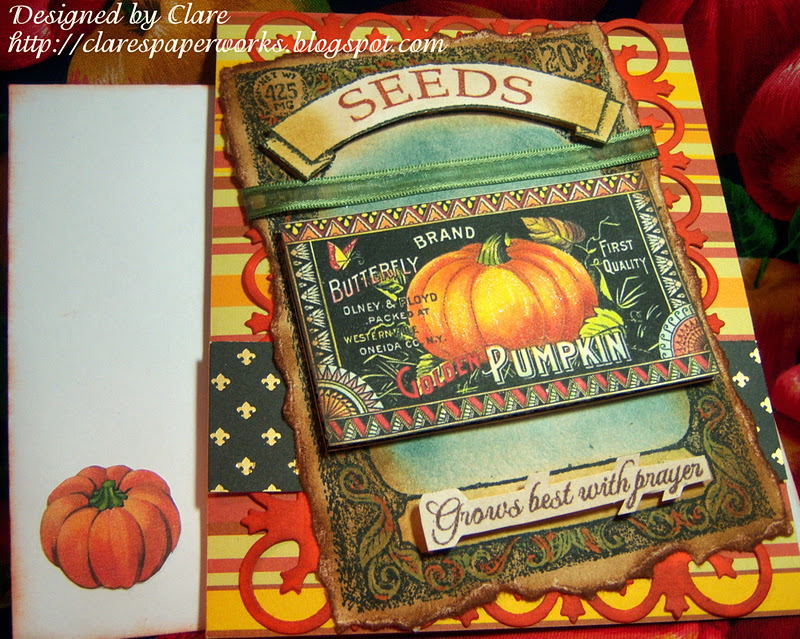
This card was so fun to make!  I love this stamp set from Our Daily Bread Designs.  The focal image is from a Vintage Winter Holiday Postcards cd from Twisted Papers.  The little pumpkin on the envelope is from the same.

This is the inside of the card.

The pumpkin label was printed in muted colors, so I brightened
the pumpkin by coloring with Copic markers.

I got some new "toys" in the mail - some actual silver and copper stripping, and applied
some of the copper here.  It molded right onto the embossing on the orange background.  This
image is from the cd mentioned above, and the seed packet and wording are from
Our Daily Bread Designs.
I love this vintage pumpkin image from the cd above!  It's so different, and the coloring is unique.
It reminds me of all the different pumpkins we saw at the pumpkin patch, but some not this pretty!

Closeup of sparkle added to pumpkin - PUMKUM as my little grandson called it!

This is the card inside, and it could be used for any occasion during the fall.


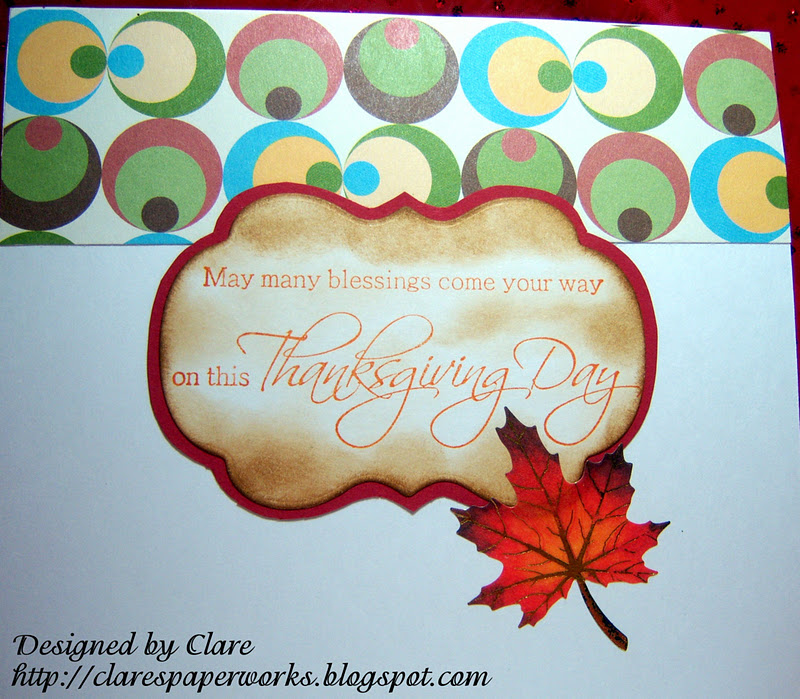
I didn't care for the background paper here too much when just looking at it by itself,
but when I put the image on top, with it's similar colors, it didn't look bad!  The paper
looked like a bunch of eyeballs!  lol  The swirls and leaves are from Heartfelt Creations.
The Thanksgiving Greetings panel is from the Vintage Winter Holiday Postcard cd.


Here's a good look at the "eyeball" paper!  hehe  "May many blessings come your way
on this Thanksgiving Day" sentiment by Heartfelt Creations. 
The maple leaf is a sticker from my stash.

I love the ribbon used on this card with its leaves, pumpkins, corn and such.  It really went
well with the ODBD Stamps.  The pumpkin image is from the cd mentioned previously. 

The little leaves stamped on the burgundy background are from a stubby stamper
from Stamps by Judith.

Inside the card.

This image from the Vintage cd is just wonderful!  I put gold sparkly ink on the sun rays. 
The sticker leaves just added to the elegance as they are embossed with gold too! 

Here you can see the gold embossing on the leaves and a little on the sun rays, and the bow.

This sentiment from my stash, spells it out!


I would love it if you would leave a comment!  I appreciate all comments left!

Tuesday, October 25, 2011

Back in business!

I have worked on my blog for 1 1/2 days, and I think I got the "bugs" worked out.  I hope you enjoy, and thank you for your visit!  I appreciate you!

Shoes and Purses Galore!

Have you ever wanted to wear a pair of beautiful shoes, and carry the gorgeous purse that matched?  I have, and my daughter says I should become a shoe designer!  I don't think I have time for that, but I do have time to share with you the 12 sets of shoes and purses I made for a recent church function, Festival of Tables.  I decorated my two tables for High Tea, and my ladies had so much fun, as well as all of the other ladies who didn't sit at my tables.  All of the tables were decorated beautifully, and there were some "just-plain-ol'-fun" ones, too!  I hope you'll leave a comment below on what you think of my shoes and purses.  Thank you for visiting!  If you'd like the directions on how to make these, please contact me.  I cannot chose between them one favorite - they're all my faves!


About Me

My photo
Lebanon, TN, United States
I am a child of God, wife, mother of three, and gramma of six. I enjoy stamping, scrapbooking, beading, photography, sewing, camping, fishing, hiking and life! I am a retired dog groomer. Denver, Colorado, is where I was born and raised. I miss the snow and drier weather.


Blog Archive